Customizing Form Settings
Understanding and configuring form settings in Mixo helps enhance the user experience and ensures that the data collection process is efficient and seamless. Below, we explain the various settings available and provide instructions on how to adjust them according to your needs.

Step 1: Visit the Form Settings
Start by logging into your Mixo account, then enter the Site Editor for the website where your form resides. Navigate to the form you wish to customize and click “Edit”. Find the “Form” section in the editor and click on “Form Settings” at the bottom.
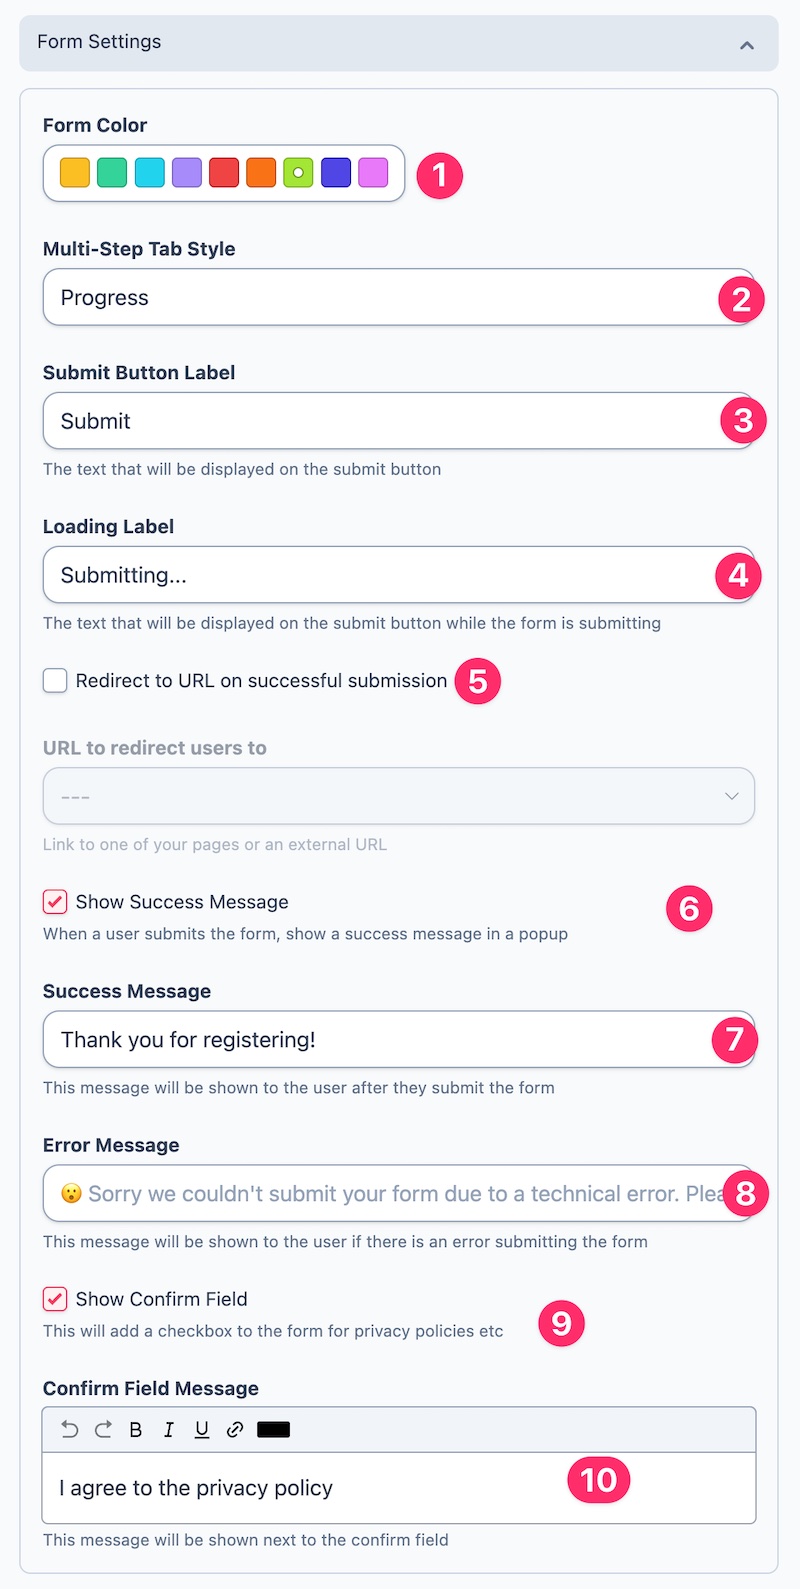
Form Color [1]
What It Does:
Form Color allows you to set a distinctive color for your form in the Mixo editor interface, making it easier to identify and distinguish from other forms on your dashboard.
How to Change:
- In the “Form Settings”, locate the color picker option.
- Click on it and choose your desired color from the palette.
Submit Button Label [3]
What It Does:
This setting changes the text displayed on the submit button of your form. It is essential for instructing users to submit their information once they complete the form.
How to Change:
- Find the “Submit Button Label” field.
- Enter the desired text (e.g., “Register Now”, “Send Message”).
Loading Label [4]
What It Does:
The Loading Label appears on the submit button while the form is processing the submission. A clear loading label reassures users that their submission is being sent.
How to Change:
- In the form settings, look for “Loading Label”.
- Type in the text you want users to see during submission (e.g., “Loading…”).
Redirect to URL [5]
What It Does:
After a successful form submission, you can redirect users to a different URL. This can be a thank-you page or any resource you’d prefer they visit next.
How to Change:
- Locate “Redirect to URL” in the settings.
- Paste the full URL where you would like users to be redirected.
Success / Error Messages [6, 7, 8]
What They Do:
These messages notify users of the form’s successful submission status or if errors occur. Clear and concise messages improve user communication and experience.
How to Change:
- Find “Success Message” and “Error Message” fields.
- Enter the text you wish users to see in each scenario.
Confirm Field Message [9, 10]
What It Does:
The Confirm Field Message is crucial for compliance, displaying next to a confirmation checkbox. It often links to your privacy policy or terms of service.
How to Change:
- In “Form Settings”, search for “Confirm Field Message”.
- Input the message text and link to your privacy policy if necessary.
Conclusion
Adjusting these settings helps tailor the user experience to your specific needs. Regularly review and update your form settings to maintain an optimal interface. For further assistance or to provide feedback, reach out to Mixo’s support team at feedback.mixo.io.
“I tried three other AI Website builders, and Mixo always came out on top. The interface is easy to understand. The template is simple to use, and customer service is fast, precise, and clear.”
Trusted by over 750,000 of the most innovative creators in the world.
Mixo is the trusted, easy-to-use platform chosen by everyone from solo entrepreneurs to employees at Fortune 500 companies for its reliability, quality, and cutting-edge features.